
LMNTRIX has been using Macros for quite some time now. We’ve seen it being used over and over again with word documents for several phishing activities during threat hunting and responding to IR cases over quite a brief period of time. Microsoft introduced Excel 4.0 Macros in 1992. But due to the complexity of writing Excel 4.0 Macros, there weren’t a lot of defensive tools which detected them. Excel 4.0 Macros introduced several new techniques which made detections even harder to perform. Macros are used heavily especially in Excel in most large organizations to automate the tasks of calculations and building charts based on these calculations. This is one of the main reason why it becomes easier to phish CEOs and Accountants with Excel 4.0 Macros rather than using Word or PowerPoint. With enough creativity, you can use these Macros with Salary/Appraisal-based Excel templates to phish even usual employees. In this blog post, we will take a look at running shellcode via Excel 4.0 Macros.
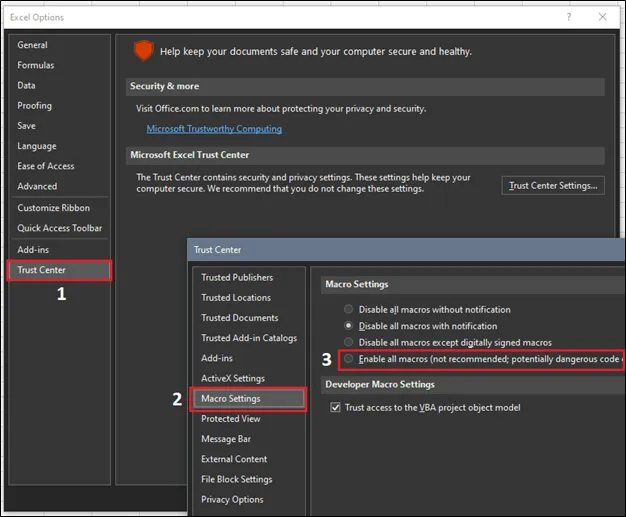
We will first start Excel with an empty sheet and enable Macros. Macros in excel can be enabled by going to File -> Options -> Trust Center -> Macro Settings. Here we will enable all macros for the time being.
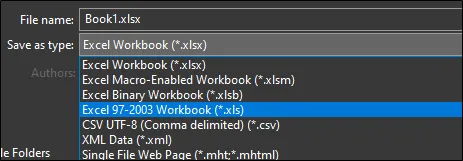
Make sure to save this file as a 97-2003 .xls file format. Using anything else will either not work or likely trigger an alert (xlsm) that a macro is being run on the host machine. We have had several successful engagements by using .xls format.
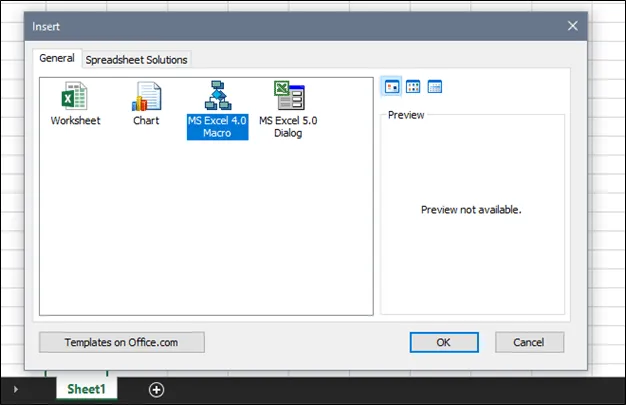
Right click on the ‘Sheet1’ of your excel file and add an Excel 4.0 Macro Sheet here.
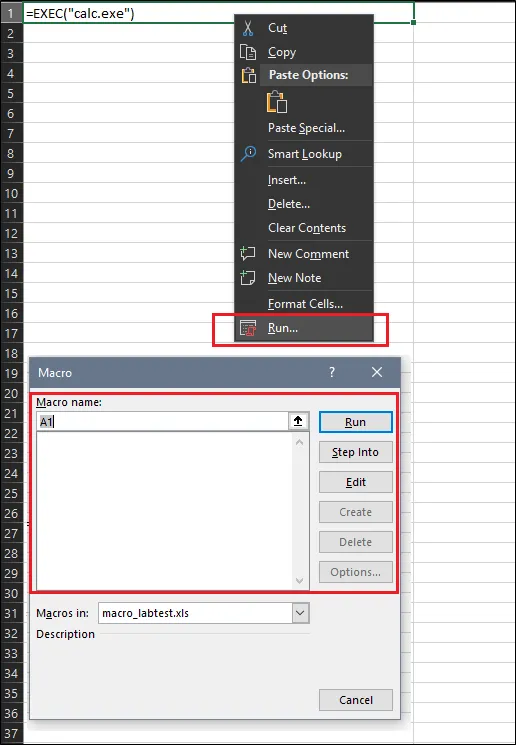
We will write our code in this sheet and then hide it to avoid being suspicious from the target user. We can simply execute a simple on-disk executable using excel 4.0 macros using the below command:

We can execute the above macro by right clicking the box and running it. This should pop a calc.exe on the host.
But however, this is way too simple. During a phishing campaign, we might need to execute shellcode, HTAs or even simple C# script sometimes. XLM macros were beautifully designed by Microsoft in such a way that it becomes very interesting to see the different ways we can use it to call WinAPIs. So, we will need to write a macro to find VirtualAlloc, WriteProcessMemory, CreateThread from kernel32.dll, copy our shellcode to a block where the macro can read it and use it to call CreateThread on it. We can do that by using the REGISTER COM object. More information on EXCEL functions can be found here. Microsoft introduced this merger of COM object with Excel 4.0 macros in 1993. The format to load a DLL in memory using the REGISTER function is as follows:
| =REGISTER(dll_to_load, symbol_name, return_types, symbol_alias, symbol_argument, macro_type, macro_category) |
In our case, the above function would work like this:
- dll_to_load: kernel32.dll.
- symbol_names: VirtualAlloc, WriteProcessMemory and CreateThread
- return_types: These are the return types of the symbol that we will execute
- symbol_alias: An alias for the symbol which will store the symbol’s address
- symbol_argument: Optional arguments to pass to the symbol
- macro_type: Type of the macro. It will be 1 for us which reflects function
- macro_category: This is only for old Excel compatibility. Use any arbitrary number between 1 to 14.
The return_types specify the return type and the argument types of the symbol that we would execute from the DLL. For Example, VirtualAlloc takes 4 arguments:
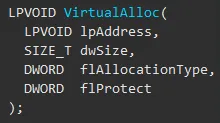
So, for us, the return type for this Symbol would be “JJJJJ”. According to Microsoft documentation, each data has a type ranging from A to R. Our return type has 5 ‘J’. The first one stands for the return type which is LPVOID and as we know LPVOID is a 4-byte signed integer. Similar is the case for the 4 arguments for VirtualAlloc. All the types are pointers which basically becomes the remaining 4 ‘J’s. So, we have 5 ‘J’s as arguments in total. If we have a string pointer, then the type would be ‘C’, which is what we will use in WriteProcessMemory WinAPI. If you are planning to execute x64 shellcode, better use 8 byte signed integers instead of J. If we wrap what we know till now, the final XLM code for finding the Symbol addresses will look like this:

Once we have the required addresses for these functions, we will run these Symbol’s function like we would usually do in any other programming language by providing arguments to them.
You can create shellcode payloads using Metasploit, Cobalt Strike (raw format) or any other Command and Control that you use to create raw shellcode. We will be using our internal C2 for this task and convert the opcodes of the shellcode to simple CHAR variable of Excel. These CHAR variables are just the ASCII code for each hex value for your shellcode.
Once we have the addresses for each of the Symbols from Figure 7, we will Call the alias VAlloc along with the 4 VirtualAlloc parameters. We will be assigning 1000000 bytes with VirtualAlloc since these are CHAR characters. It all depends on the length of you shellcode however. If you assign more space than the size of your shellcode, it doesn’t matter, but don’t assign lesser size. Our payload is of 54 Kilobytes, and we are assigning more size here for VirtualAlloc. We can call this symbol as follows:
| =Valloc(0,1000000,4096,64) |
One more thing to make sure of is to stop writing to memory when we find the final byte of our payload. We can do this using an “END” string at the end of our payload as can be seen in Figure 8. We will split our payload since the size of the payload is extremely huge and a single Excel Cell cannot contain characters of that size. You can split it in any length you want. We will equally split the payload and store it in Column B in vertical manner like B1, B2, B3 and so on. Since we are splitting our payload, we will need to add them up before we write it to a Virtual Memory. We can do this by writing another small XLM function SELECT which will add them up before calling WriteProcessMemory. The code should look like this:

Make sure you add “END” at the end of the CHAR shellcode. We will use this to calculate the length of the shellcode which we did in Cell A7 and A8. Once we have the shellcode, we will write this to the allocated process memory using our alias WProcessMemory (A9).
WriteProcessMemory will loop until it reaches the string “END” which we looped on cell A7. After writing the process memory, we will move the output in C1+1 which we stored earlier (Figure 8: A9 -> C1 * 255) to just C1. We will select the rows using the SELECT Function and move to the next cell using the NEXT function. Here we will call the buffer which we allocated and stored in cell A4 (Valloc) using CreateThread (alias: CThread). We will use the function HALT to wait till the shellcode completes running.
Macros are fun to write, but can become complicated pretty quickly. For a defender, the main task would be to find the obfuscated shellcode since Excel with its complicated formulas can make even simple tasks look complicated, let alone a motivated attacker who is ready to sit day and night just to write a hardcore payload to just evade the endpoint. We used WriteProcessMemory and CreateThread to inject our shellcode to the current process. This blog was just a POC for now, but it would be a bad idea to inject the shellcode in the same Excel process. Any EDR will easily catch an Excel document making an internet connection. Worse scenario would be if the target user decides to close the excel sheet, the shellcode would also be terminated from the Excel’s memory. During a real engagement, it’s always better to enumerate running process and inject it to a common process using VirtualAllocEx, WriteProcessMemory and CreateRemoteThread.
One final thing to note is that Microsoft replaced Excel 4.0 macros with VBA in the early 90s. So even though this feature works for now, you never know when Microsoft will remove this functionality since this is mostly a deprecated feature as compared to our latest VBA.


