We at LMNTRIX Active Offense love phishing activities. A new phishing activity means being more creative to get someone to execute our payload. In one of the previous blogs, we wrote an Excel 4.0 phishing macro to execute Cobalt Strike shellcode. However, today we will setup a phishing infra using Mailgun and GoPhish which can be used alongside the previously built macro to gain an initial foothold on our target.
Mailgun is a transactional mail service provider. It has a powerful setup of APIs to automate sending and receiving of e-mails which can be extremely helpful for commercial applications. However, we will only be using it’s core functionality of sending mails along with it’s API key. We will use GoPhish which is a standalone executable to setup a UI for our phishing server where we can build crafty E-mail Templates and store them for phishing activity. The GoPhish will use the API keys of Mailgun to send mails via the Mail server. We will use Namecheap to setup our domain for the phishing activity, however you can use any other Domain Service Providers either.
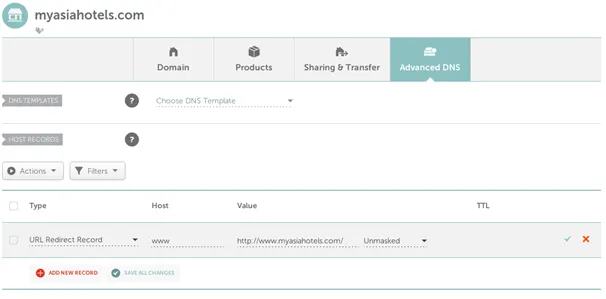
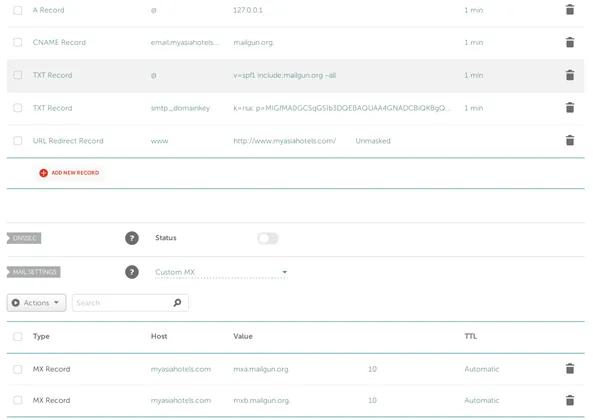
We will start by purchasing a Domain from Namecheap. In our case, the domain is myasiahotels.com – just a random domain for testing purpose. In Namecheap, by default there should only be one entry in the Host Records as follows:
We will register our new domain in Mailgun and add the entries requested by Mailgun in our domain’s host records. To create a new domain entry in Mailgun, login to Mailgun and select Sending->Domains->Add New Domain as can be seen below.

Add a new entry by clicking Add New Domain, and enter your domain name. Make sure you select Advanced Settings and enabled DKIM.
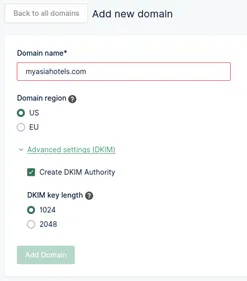
DKIM (Domain Keys Identified Mail) gives a digital signature to your email. This can be verified by the receiving server to verify that the email indeed came from the domain it is trying to represent. This signature is added to the e-mail headers and is always encrypted. Most email service providers provide this option and it also helps to verify that our domain is indeed a real one and not a spoofed one. This is however one of the many things that we need to do to make sure our email lands in the Inbox and not inside spam.
After registering the domain, Mailgun will provide us multiple host records that we need to add to our domain in Namecheap. This is done to verify that we are only adding a domain that we own and not spoofing someone else’s domain. The host records in Mailgun would look like this:
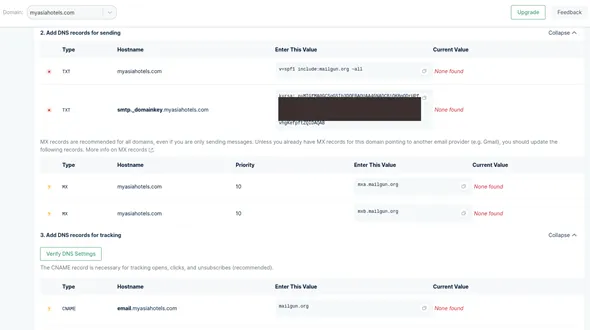
As you can see, the image above shows x-mark and question mark since we are yet to add these records to our domain. Once we add and verify them here, it should convert to green tick marks. The above host records won’t exist in our domain records by default. We will have to create each of them and add them manually. Select Add New Record option in Namecheap to add new records. Once the records have been added as shown below, select Verify DNS Settings to get the settings verified in Mailgun.
Once we our registered domain verified in Mailgun, it’s time to setup our GoPhish Server and use the SMTP credentials of our newly registered domain to our GoPhish Server. You can select Sending->Domains settings->SMTP Credentials->Reset Password in Mailgun to view the SMTP credentials for the root user of your domain. The root user by default will be postmaster@<your-domain-name> (which in our case would be myasiahotels.com).

Now we will download the latest GoPhish binary from https://github.com/gophish/gophish/releases. At the time of writing this blog, the GoPhish version was v0.11.0. The best part about GoPhish is that it’s written in Go and it always results in a single executable when compiled. So, we don’t need to worry about any missing dependencies. We will host GoPhish on the same host which points to myasiahotels.com. GoPhish requires a json file from which it parses the configuration details from. Below is the json config which we will use. It will make the GoPhish admin portal run on port 1234 and the actual phishing server on port 443.
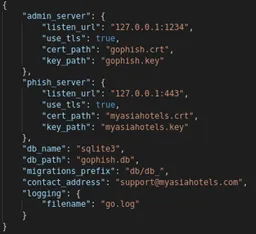
You can generate the necessary SSL keys using Let’s Encrypt and provide them in the above configuration file. Some organizations which are pretty hard on their security, have lately started to filter out web servers which use Let’s Encrypt SSL certificate on their organizational proxy servers. If you are doing an actual red team engagement, then you would be better of buying an actual SSL certificate instead of using a 4-month valid cert from Let’s Encrypt and blowing your cover. In the above configuration, make sure you change the phish server’s url to the actual IP address where your domain is pointing to. This is where you actual phishing page will be hosted. Alternatively, you can also disable this, if you believe in advanced threat tactics and want to use a more custom phishing config using ngnix or any other custom tool.
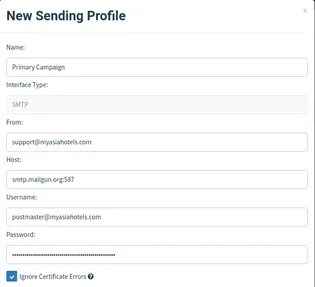
Now we can execute GoPhish with the above config file as a parameter and visit 127.0.0.1:1234. This is the admin portal for GoPhish and you can find the login credentials on the terminal when you execute GoPhish. After login into the GoPhish server, select Sending Profiles->New Profile. Enter a profile name that you wish and the email you want to send the phishing email from. This email can be any name, but the email domain should be your domain registered in Mailgun. Enter your postmaster’s mail ID and password provided by Mailgun above and use smtp.mailgun.org:587 (uses TLS) for mail server. This is how the configuration would look like:
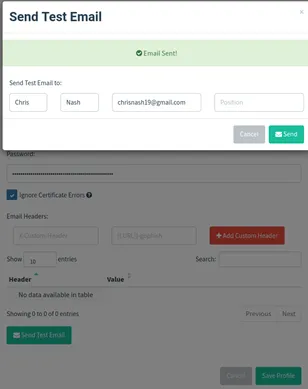
And before you save the above config, select the Send Test Email button to check whether your mail lands in the inbox. We will send a test mail to our Gmail ID and check if our hosted server works. Gmail has a really good spam filter and this should give us a fair idea whether our mail would land in the Inbox or Spam.
And the Gmail Inbox:
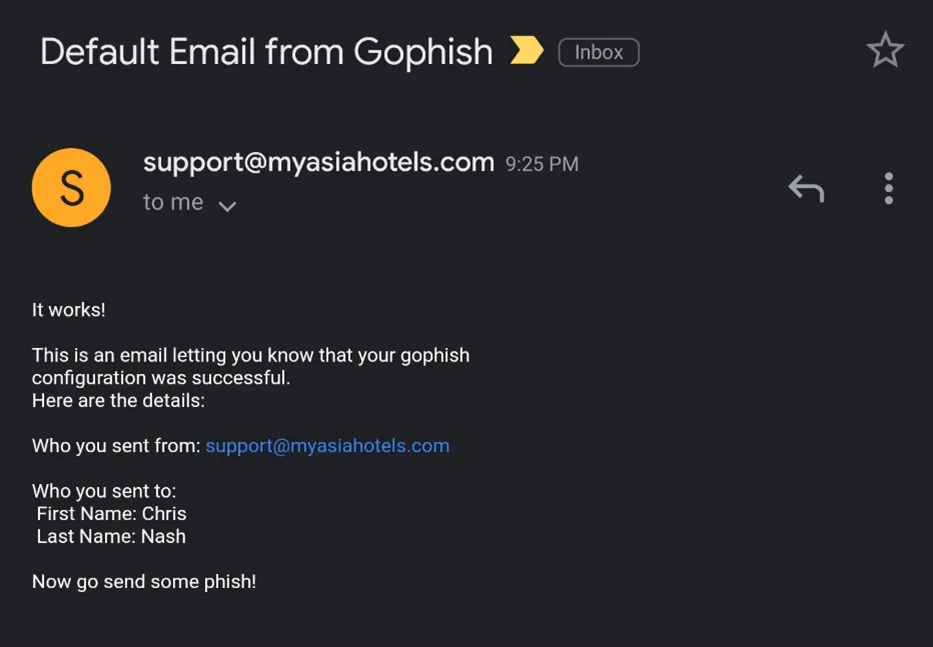
Great, now that our phishing server works, we can add a list of users that we want to phish by selecting Users->Groups in the GoPhish dashboard, and create an email template by selecting Email Templates. Now that we have everything set, the only pending task would be to use our creativity to build phishing templates and phish our target.
For more information about the LMNTRIX Active Offense – Red Teaming capability or if you have any questions about this article, you can reach us at info@lmntrix.com.


